描述使用者介面
React 是一個用來渲染使用者介面 (UI) 的 Javascript 函式庫。一個完整的使用者介面是用各種小元件(例如按鈕、文字或圖片)組合而成。React 讓你將這些小元件組合成可以重複使用、可以巢狀使用的 component。
無論是網站還是手機 App,所有畫面上的東西都可以被拆分成一個個 component。在這個章節,你將學會如何建立、客製化以及根據不同的條件來在畫面上渲染 React component。
In this chapter
你的第一個 component
一個完整的 React 應用程式是由多個被稱為 Component 的使用者介面分塊組合而成。一個 React Component 是一個你可以在裡面使用 Markup 語法的 Javascript 函數。
Component 可能小至一個按鈕,也可能大至整個頁面。這裡有一個名叫 Gallery 的 Component,這個 Component 裡面渲染了三個名叫 Profile 的 Component:
function Profile() {
  return (
    <img
      src="https://i.imgur.com/MK3eW3As.jpg"
      alt="Katherine Johnson"
    />
  );
}

export default function Gallery() {
  return (
    <section>
      <h1>驚人的科學家們</h1>
      <Profile />
      <Profile />
      <Profile />
    </section>
  );
}
導入和導出 Component
你可以在一個檔案中宣告很多的 Component,但如果檔案太大的話我們將很難快速的找到想要的程式碼在檔案的哪個位置。為了解決這個問題,你可以從一個檔案 導出 一個 Component,然後在另一個檔案中 導入 這個 Component 並使用他:
import Profile from './Profile.js';

export default function Gallery() {
  return (
    <section>
      <h1>驚人的科學家們</h1>
      <Profile />
      <Profile />
      <Profile />
    </section>
  );
}
用 JSX 來撰寫 Markup 語法
每個 React component 都是一個可以渲染一些 Markup 語法到瀏覽器的 Javascript 函數,React components 使用一個語法擴充功能稱作 JSX 來表示這些 Markup 語法。JSX 看起來就像 HTML 一樣,但他比 HTML 更加嚴格一些,並且能夠顯示出動態的資訊。
如果你把一個 HTML Markup 直接貼到一個 React component 中,他不一定可以正常運作:
export default function TodoList() {
  return (
    // 這個寫法沒辦法正常運作!
    <h1>Hedy Lamarr 的待辦事項</h1>
    <img
      src="https://i.imgur.com/yXOvdOSs.jpg"
      alt="Hedy Lamarr"
      class="photo"
    >
    <ul>
      <li>Invent new traffic lights
      <li>Rehearse a movie scene
      <li>Improve spectrum technology
    </ul>
如果你有像這樣的現成 HTML,你可以用這個 轉換工具 來修復他。
export default function TodoList() {
  return (
    <>
      <h1>Hedy Lamarr 的待辦事項</h1>
      <img
        src="https://i.imgur.com/yXOvdOSs.jpg"
        alt="Hedy Lamarr"
        className="photo"
      />
      <ul>
        <li>Invent new traffic lights</li>
        <li>Rehearse a movie scene</li>
        <li>Improve spectrum technology</li>
      </ul>
    </>
  );
}
在 JSX 中使用 Javascript 的語法
JSX 讓你可以在 Javascript 檔案中使用類似 HTML 的語法,這讓我們把渲染邏輯和內容能夠寫在同一個地方。有時候你可能想要在 Markup 中使用一些 Javascript 的邏輯或是引入一個動態的變數。
在這種情況,你可以在 JSX 語法中使用 大括號 來「打開一個 Javascript 的視窗」:
const person = {
  name: 'Gregorio Y. Zara',
  theme: {
    backgroundColor: 'black',
    color: 'pink'
  }
};

export default function TodoList() {
  return (
    <div style={person.theme}>
      <h1>{person.name} 的待辦事項</h1>
      <img
        className="avatar"
        src="https://i.imgur.com/7vQD0fPs.jpg"
        alt="Gregorio Y. Zara"
      />
      <ul>
        <li>Improve the videophone</li>
        <li>Prepare aeronautics lectures</li>
        <li>Work on the alcohol-fuelled engine</li>
      </ul>
    </div>
  );
}
傳遞 Props 到一個 Component 中
React components 使用 props 來互相傳遞資訊。每個上層的 Component 都可以藉由賦予他們 Props 的方式來傳遞一些資訊到他的下層 Component 中。
Props 可能會讓你想起 HTML 語法中的 attributes,但你可以傳遞任何 JavaScript 的變數到 Props 中,包括物件、陣列、函數,甚至是 JSX!
import { getImageUrl } from './utils.js'

export default function Profile() {
  return (
    <Card>
      <Avatar
        size={100}
        person={{
          name: 'Katsuko Saruhashi',
          imageId: 'YfeOqp2'
        }}
      />
    </Card>
  );
}

function Avatar({ person, size }) {
  return (
    <img
      className="avatar"
      src={getImageUrl(person)}
      alt={person.name}
      width={size}
      height={size}
    />
  );
}

function Card({ children }) {
  return (
    <div className="card">
      {children}
    </div>
  );
}
條件渲染
有時候你的 Component 會需要根據不同的條件來展示不同的內容。在 React 中,你可以使用 JavaScript 語法中的 if 陳述式,&& 以及 ? : 運算子來根據條件渲染不同的 JSX。
在下面的範例中,我們用 JavaScript 的 && 運算子來根據條件渲染打勾符號:
function Item({ name, isPacked }) {
  return (
    <li className="item">
      {name} {isPacked && '✅'}
    </li>
  );
}

export default function PackingList() {
  return (
    <section>
      <h1>Sally Ride's Packing List</h1>
      <ul>
        <Item
          isPacked={true}
          name="Space suit"
        />
        <Item
          isPacked={true}
          name="Helmet with a golden leaf"
        />
        <Item
          isPacked={false}
          name="Photo of Tam"
        />
      </ul>
    </section>
  );
}
列表渲染
你經常會需要用多個相似的 Component 來展示一系列的資料。這個時候你可以在 React 中使用 JavaScript 的 filter() 和 map() 來篩選資料並轉換成包含多個 Component 的陣列。
對轉換後的陣列中的每個物件,你必須要幫他們指定一個 key。 一般來說,你可以用他們在資料庫中的 ID 來作為 key。 Key 可以讓 React 知道列表中每個物件當前的位置,即便你的列表發生了改動也沒關係。
import { people } from './data.js';
import { getImageUrl } from './utils.js';

export default function List() {
  const listItems = people.map(person =>
    <li key={person.id}>
      <img
        src={getImageUrl(person)}
        alt={person.name}
      />
      <p>
        <b>{person.name}:</b>
        {' ' + person.profession + ' '}
        known for {person.accomplishment}
      </p>
    </li>
  );
  return (
    <article>
      <h1>科學家列表</h1>
      <ul>{listItems}</ul>
    </article>
  );
}
把 Component 寫成「純函數」
我們說一個 JavaScript 的函數是一個 純函數 (Pure Function) ,如果他滿足這些條件:
- 不多管閒事 : 這個函數不會修改任何在他被呼叫之前就已經存在的物件或變數。
- 一樣的輸入,一樣的輸出 : 只要我們輸入相同的參數,這個函數總是回傳一個相同的輸出。
如果我們嚴格地把 Component 都寫成純函數,就可以在隨著專案規模越來越大的過程中避免一系列不可預期的問題出現。這裡給出了一個「不純的函數」作為例子:
let guest = 0;

function Cup() {
  // Bad: changing a preexisting variable!
  guest = guest + 1;
  return <h2>Tea cup for guest #{guest}</h2>;
}

export default function TeaSet() {
  return (
    <>
      <Cup />
      <Cup />
      <Cup />
    </>
  );
}
你可以藉由改成 Props 傳入資料的方式,而不是直接從外部讀取,來將函數改造為純函數:
function Cup({ guest }) {
  return <h2>Tea cup for guest #{guest}</h2>;
}

export default function TeaSet() {
  return (
    <>
      <Cup guest={1} />
      <Cup guest={2} />
      <Cup guest={3} />
    </>
  );
}
你的 UI 作為一棵樹
React 使用 tree 來建模 component 和 module 之間的關係。
React render tree 是 component 之間父子關係的表示。


一個 React render tree 範例。
靠近 tree 頂部、靠近 root component 的 component 被視為 top-level component。沒有 child component 的 component 是 leaf component。這種 component 分類對於理解 data flow 和 rendering 效能很有用。
對 JavaScript module 之間的關係進行建模是了解應用程式的另一種有用方法。 我們稱之為 module dependency tree。
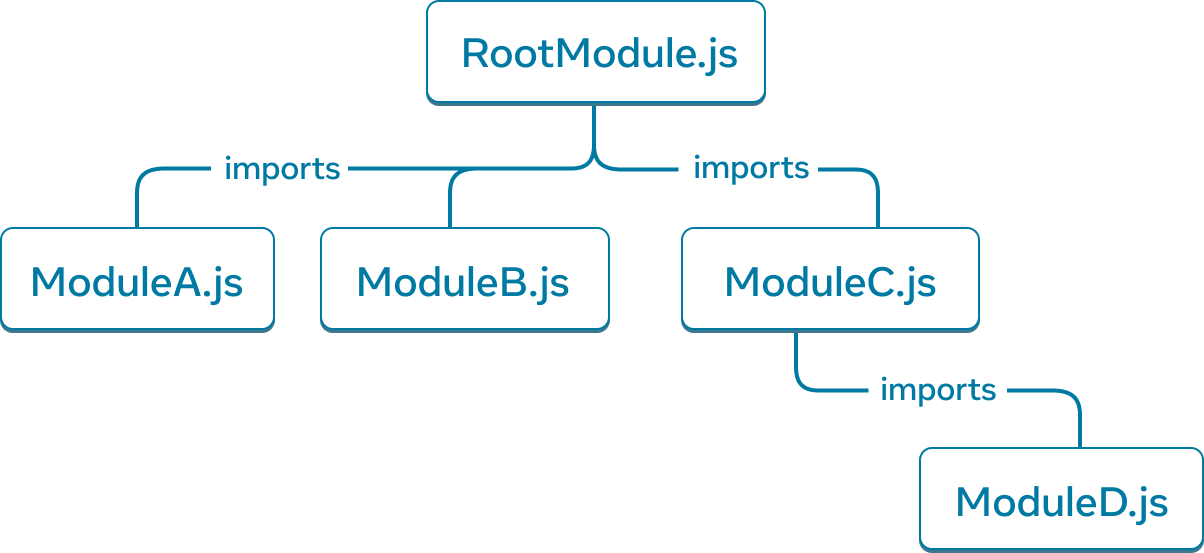
一個 module dependency tree 範例。
建置工具經常使用 dependency tree 來 bundle 所有相關的 JavaScript 程式碼,以供使用者端下載和 render。較大的套件大小會降低 React 應用程式的使用者體驗。 了解 module dependency tree 有助於 debug 此類問題。
Ready to learn this topic?
閱讀**你的 UI 作為一棵樹**了解如何為 React 應用程式建立 render 和 module dependency tree 以及它們如何在心智模型上發揮作用用於改善使用者體驗和效能的模型。
Read More下一步
出發前往 你的第一個 Component 來一頁一頁閱讀這個章節的內容!
或是,如果你已經熟悉這些主題了,不妨瞭解看看 加入可互動性 ?