快速開始
歡迎來到 React 文件!本頁將向介紹 80% 日常使用的 React 概念。
You will learn
- 如何建立和巢狀 component
- 如何加入標記語言和樣式
- 如何顯示資料
- 如何 render 條件和列表
- 如何回應事件和更新畫面
- 如何在 component 之間共享資料
建立和巢狀 component
React 應用程式是由 components 組成的。Component 是具有自己的邏輯和外觀的 UI(使用者介面)的一部分。Component 可以像按鈕一樣小,也可以像整個頁面一樣大。
React component 是回傳標記語言的 JavaScript 函式。
function MyButton() {
  return (
    <button>I'm a button</button>
  );
}
現在你已經宣告 MyButton,你可以將它嵌入另一個 component 中。
export default function MyApp() {
  return (
    <div>
      <h1>Welcome to my app</h1>
      <MyButton />
    </div>
  );
}
注意 <MyButton /> 開頭是大寫字母,這就是你知道它是 React component 的方式。React component 名稱一定要以大寫字母開頭,而 HTML 標記語言則必須為小寫字母。
請看一下結果:
function MyButton() {
  return (
    <button>
      I'm a button
    </button>
  );
}

export default function MyApp() {
  return (
    <div>
      <h1>Welcome to my app</h1>
      <MyButton />
    </div>
  );
}
export default 關鍵字指定檔案中的主要 component。如果你對某些 JavaScript 語法不熟悉,MDN 和 javascript.info 都有很棒的參考資料。
使用 JSX 撰寫標記語言
你所看到的標記語法稱為 JSX。它是可選的,但大多數 React 專案都會因其方便性而使用 JSX。我們推薦的本機開發工具都預設支援 JSX。
JSX 比 HTML 更嚴格。你必須正確地封閉標記,例如 <br />。你的 component 也不能回傳多個 JSX 標記,你必須將它們包裹在共同的 parent 標記中,例如 <div>...</div> 或空的 <>...</> wrapper 中:
function AboutPage() {
  return (
    <>
      <h1>About</h1>
      <p>Hello there.<br />How do you do?</p>
    </>
  );
}
如果你有大量的 HTML 要移植到 JSX,你可以使用線上轉換。
加入樣式
在 React 中,你可以使用 className 來指定 CSS 類別,它的功能與 HTML 的 class attribute 相同:
<img className="avatar" />接著你可以在單獨的 CSS 檔案中撰寫對應的 CSS 規則:
/* In your CSS */
.avatar {
  border-radius: 50%;
}
React 不規定如何加入 CSS 文件。在最簡單的情況下,你可以在 HTML 中增加一個 <link> 標籤。如果你使用的是構建工具或框架,請查閱其文件以了解如何將 CSS 文件加入到你的專案中。
顯示資料
JSX 讓你可以將標記語言放入 JavaScript。大括號讓你「逃回」 JavaScript,以便你可以嵌入一些來自你的程式碼的變數,並將其顯示給使用者。例如,這將顯示 user.name:
return (
  <h1>
    {user.name}
  </h1>
);
你也可以從 JSX attribute 「逃脫到 JavaScript」 ,但你必須使用大括號而不是引號。例如,className="avatar" 將 "avatar" string 作為 CSS class 傳遞,但 src={user.imageUrl} 讀取 JavaScript user.imageUrl 變數值,將該值作為 src attrubute 傳遞:
return (
  <img
    className="avatar"
    src={user.imageUrl}
  />
);
你可以將更複雜的表達式放入 JSX 大括號中,例如字串串接。
const user = {
  name: 'Hedy Lamarr',
  imageUrl: 'https://i.imgur.com/yXOvdOSs.jpg',
  imageSize: 90,
};

export default function Profile() {
  return (
    <>
      <h1>{user.name}</h1>
      <img
        className="avatar"
        src={user.imageUrl}
        alt={'Photo of ' + user.name}
        style={{
          width: user.imageSize,
          height: user.imageSize
        }}
      />
    </>
  );
}
在上述範例中,style={{}} 並非特殊語法,而是在 style={ } JSX 大括號中的一個普通的 {} object。當你的樣式取決於 JavaScript 變數時,可以使用 style 屬性。
條件式 rendering
在 React 中,沒有特殊的語法可以撰寫條件。相反,你會使用相同撰寫一般 JavaScript 的技巧來撰寫 React 程式碼。例如,你可以使用 if 條件式語句來包含 JSX:
let content;
if (isLoggedIn) {
  content = <AdminPanel />;
} else {
  content = <LoginForm />;
}
return (
  <div>
    {content}
  </div>
);
如果你偏好更緊湊的程式碼,你可以使用 ? 條件運算子。與 if 不同,它可以在 JSX 內部運作:
<div>
  {isLoggedIn ? (
    <AdminPanel />
  ) : (
    <LoginForm />
  )}
</div>
當你不需要 else 分支時,你也可以使用更簡短的 && 邏輯語法:
<div>
  {isLoggedIn && <AdminPanel />}
</div>
這些方法也適用於有條件地指定 attribute。如果你對這些 JavaScript 語法不熟悉,你可以一開始就使用 if...else。
Rendering 列表
你將會依賴 JavaScript for loop 和 array map() 函式功能來 render component 的列表。
例如,如果你有一個產品的列表:
const products = [
  { title: 'Cabbage', id: 1 },
  { title: 'Garlic', id: 2 },
  { title: 'Apple', id: 3 },
];
在你的 component 內,使用 map() 函式將一個產品的 array 轉換成一個 <li> 項目的 array:
const listItems = products.map(product =>
  <li key={product.id}>
    {product.title}
  </li>
);

return (
  <ul>{listItems}</ul>
);
請注意 <li> 有一個 key attribute。對於列表中的每個項目,你應該傳遞一個 string 或 number,以便在其兄弟元素中識別該唯一項目。通常,鍵值應該來自於你的資料,例如資料庫的 ID。React 使用這些鍵值來了解後續的插入、刪除或重新排序項目時所發生的變化。
const products = [
  { title: 'Cabbage', isFruit: false, id: 1 },
  { title: 'Garlic', isFruit: false, id: 2 },
  { title: 'Apple', isFruit: true, id: 3 },
];

export default function ShoppingList() {
  const listItems = products.map(product =>
    <li
      key={product.id}
      style={{
        color: product.isFruit ? 'magenta' : 'darkgreen'
      }}
    >
      {product.title}
    </li>
  );

  return (
    <ul>{listItems}</ul>
  );
}
事件回應
你可以透過在 component 中宣告 event handler 函式來回應 event:
function MyButton() {
  function handleClick() {
    alert('You clicked me!');
  }

  return (
    <button onClick={handleClick}>
      Click me
    </button>
  );
}
注意 onClick={handleClick} 最後沒有括號!不要呼叫 event handler:你只需要將它傳遞下去。當使用者點擊按鈕時,React 將呼叫你的 event handler。
更新畫面
有時候,你想要 component「記住」一些資訊並呈現它。例如,你可以想要計算按鈕按過的次數。要達成這個目標,加入 state 到你的 component。
首先,從 React import useState:
import { useState } from 'react';現在你在 component 內宣告了一個 state 變數:
function MyButton() {
  const [count, setCount] = useState(0);
  // ...
你會從 useState 得到兩個東西:目前的 state(count)以及一個函式讓你可以更新 state(setCount)。你可以給它們任何的命名,但慣例是寫成 [something, setSomething]。
第一次顯示按鈕時,count 將為 0,因為你將 0 傳遞給 useState()。 當你想改變狀態時,呼叫 setCount() 並將新值傳遞給它。點擊此按鈕將增加計數器:
function MyButton() {
  const [count, setCount] = useState(0);

  function handleClick() {
    setCount(count + 1);
  }

  return (
    <button onClick={handleClick}>
      Clicked {count} times
    </button>
  );
}
React 將會再次呼叫你的 component 函式。這個時候,count 會變成 1,然後它將變成 2,以此類推。
如果你 render 相同的 component 多次,每個 component 都會有自己的 state。分別點擊各個按鈕試試:
import { useState } from 'react';

export default function MyApp() {
  return (
    <div>
      <h1>Counters that update separately</h1>
      <MyButton />
      <MyButton />
    </div>
  );
}

function MyButton() {
  const [count, setCount] = useState(0);

  function handleClick() {
    setCount(count + 1);
  }

  return (
    <button onClick={handleClick}>
      Clicked {count} times
    </button>
  );
}
注意每個按鈕如何「記住」它本身的 count state 並且不影響其他的按鈕。
使用 Hooks
以 use 開頭的函式稱為 Hooks。useState 是 React 提供的內建 Hook。你可以在 API 參考中找到其他內建的 Hooks,你也可以結合現有的 Hooks 撰寫自己的 Hooks。
Hooks 比其他功能更具限制性。你只能在 component 的頂部 呼叫 Hooks(或其他 Hooks)。如果你想在條件或循環中使用 useState,請提取一個新 component 並將 Hooks 放在那裡。
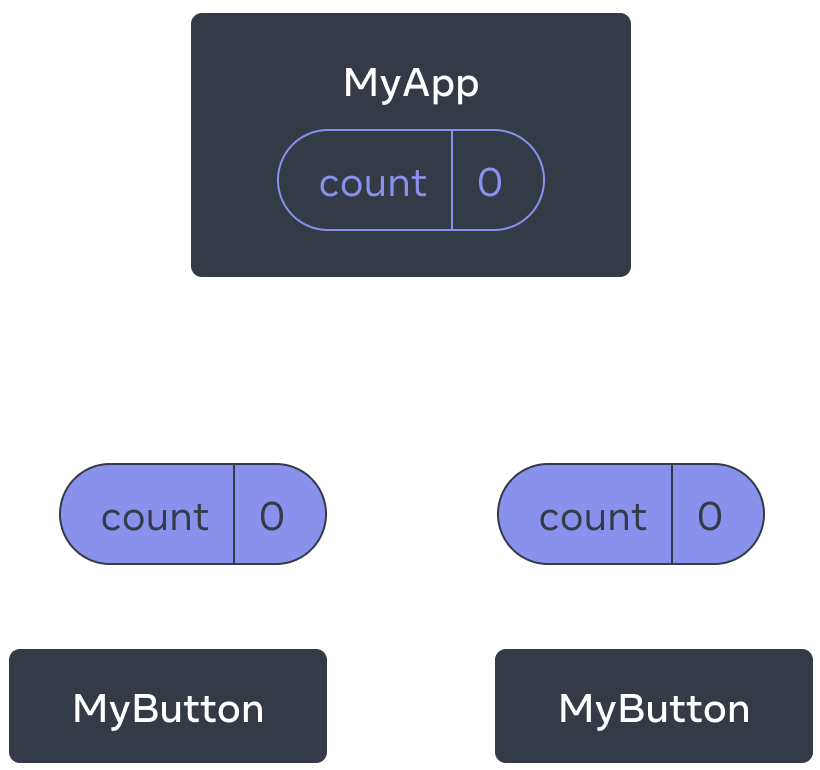
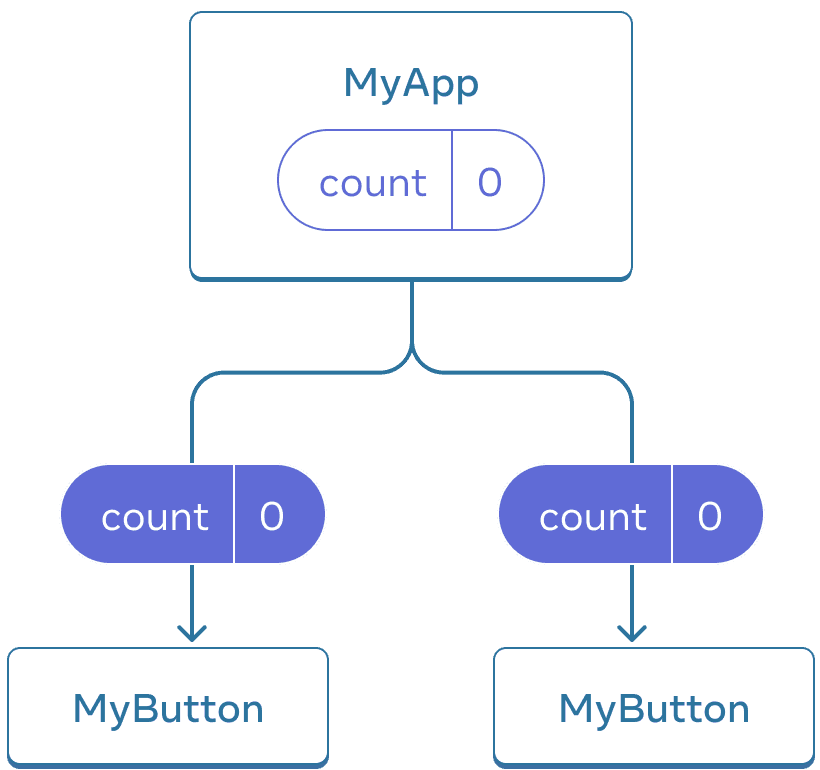
在 component 之間共享資料
在前面的範例當中,每個 MyButton 都有自己獨立的 count,當每個按鈕被點擊時,只有被點擊按鈕的 count 發生了變化:
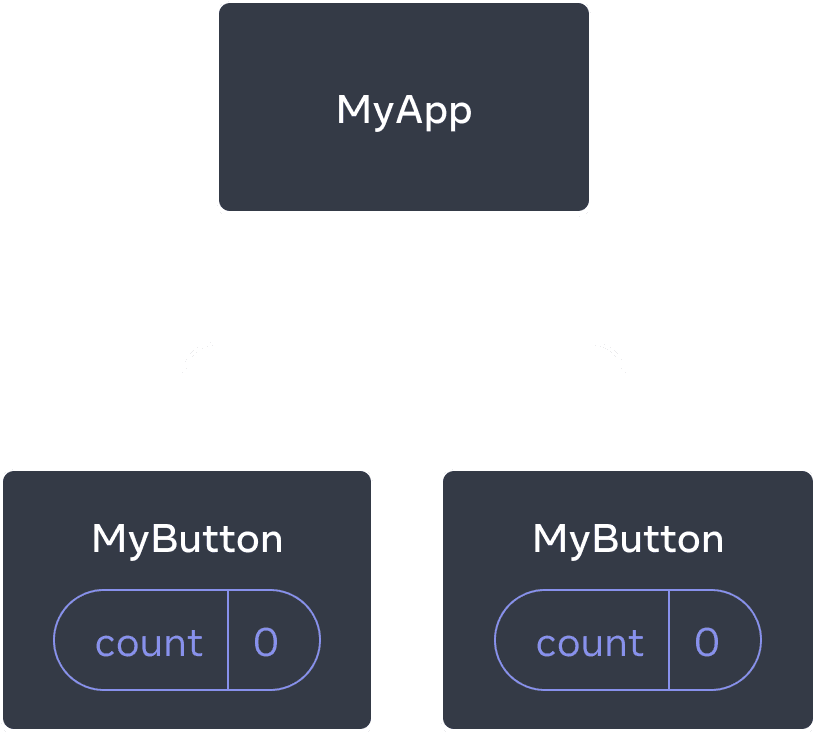
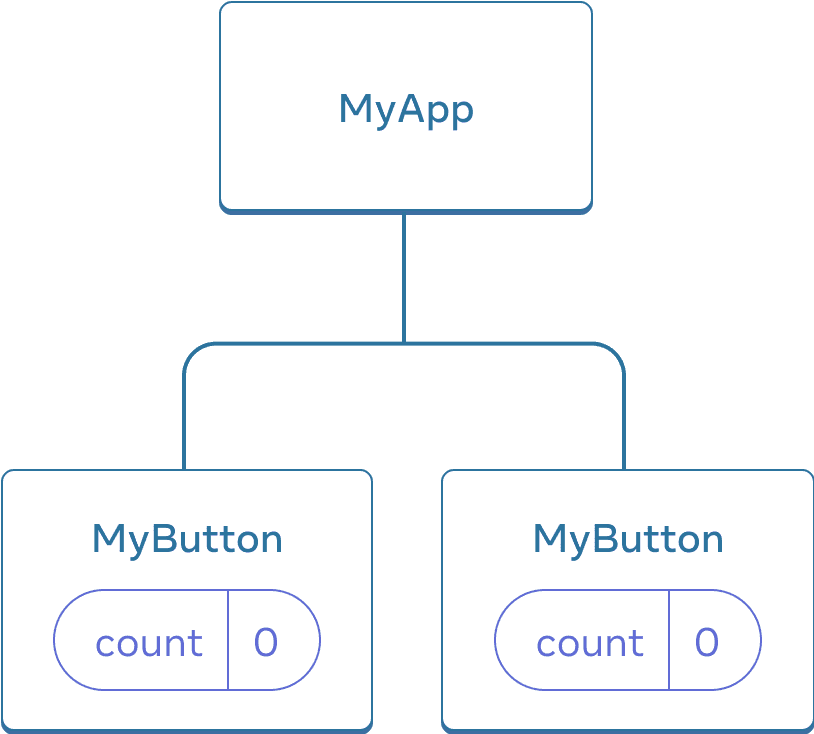
最初,每個 MyButton 的 count 狀態都是 0
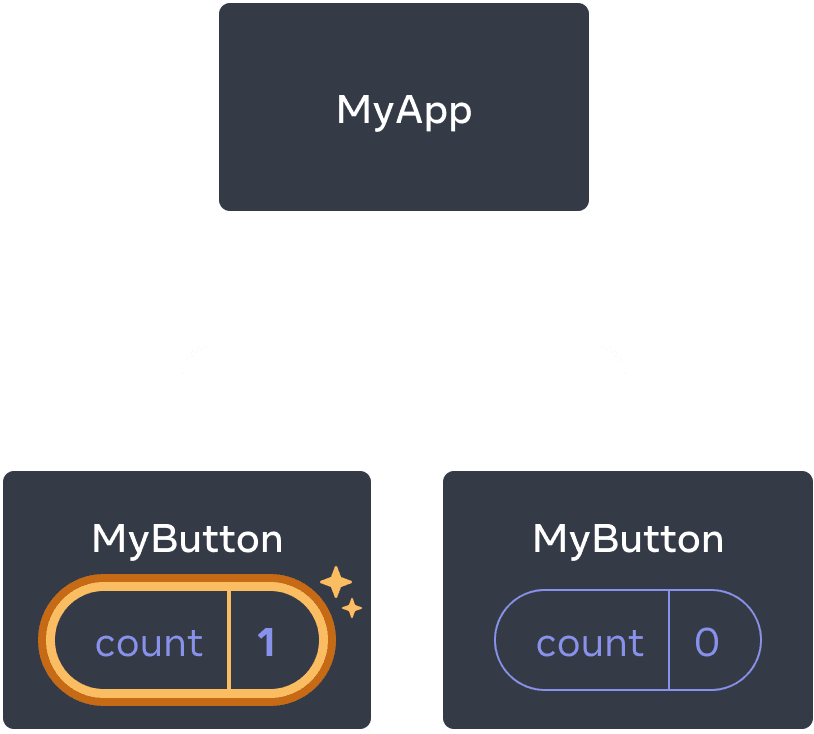
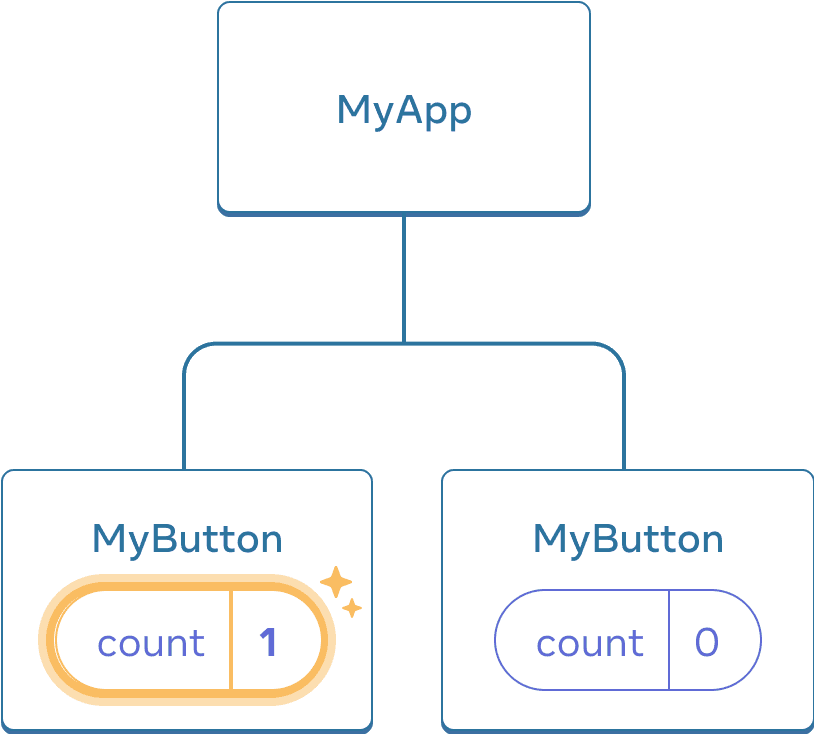
第一個 MyButton 更新 count 為 1
但是,你通常需要 component 來共享資料並始終一起更新。
要使兩個 MyButton component 顯示相同的 count 並一起更新,你需要將 state 從各個按鈕「向上」移動到包含所有按鈕的最近 component。
在這個範例中,它是 MyApp:
一開始,MyApp 的 count state 是 0 並且傳遞給兩個 children

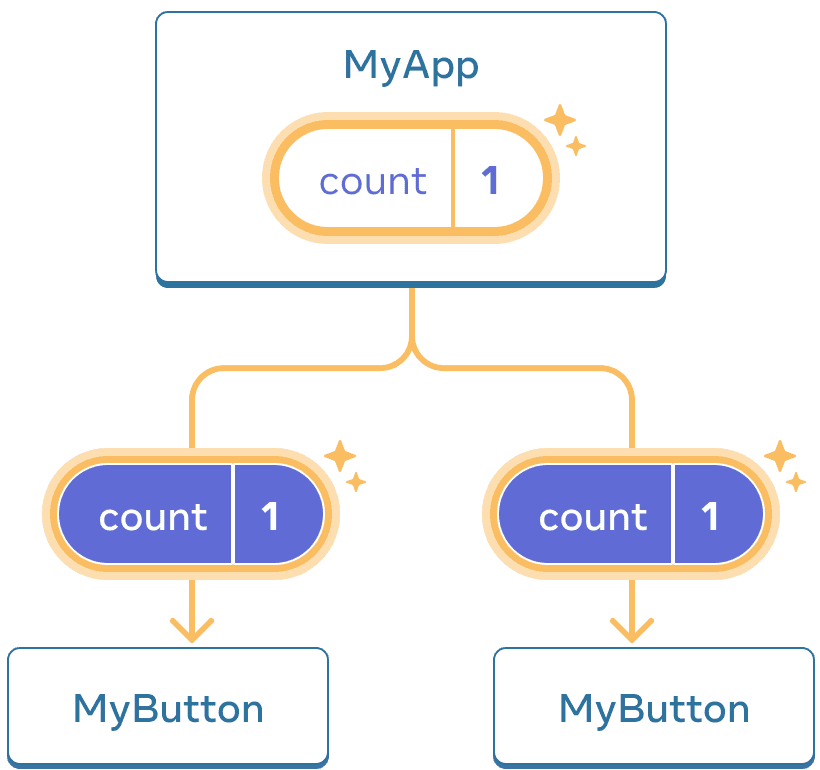
當 click 時,MyApp 更新它的 count state 成 1 並且傳遞給兩個 children
現在,當你點擊任一按鈕時,MyApp 中的 count 將發生變化,這將更改 MyButton 中的兩個計數。以下是你如何在程式碼中表達。
首先,將 MyButton 的 state 移至上方到 MyApp:
export default function MyApp() {
  const [count, setCount] = useState(0);

  function handleClick() {
    setCount(count + 1);
  }

  return (
    <div>
      <h1>Counters that update separately</h1>
      <MyButton />
      <MyButton />
    </div>
  );
}

function MyButton() {
  // ... we're moving code from here ...
}
接著,從 MyApp 往下傳遞 state 以及共享的 click handler 到每個 MyButton。你可以使用 JSX 大括號傳遞資訊到 MyButton,就像先前使用內建 <img> 標記語言一樣:
export default function MyApp() {
  const [count, setCount] = useState(0);

  function handleClick() {
    setCount(count + 1);
  }

  return (
    <div>
      <h1>Counters that update together</h1>
      <MyButton count={count} onClick={handleClick} />
      <MyButton count={count} onClick={handleClick} />
    </div>
  );
}
你像這樣傳遞下來的資訊叫做 props。現在 MyApp component 包含 count state 和 handleClick event handler,並將它們作為 props 傳遞 給每個按鈕。
最後,將 MyButton 更改為讀取 parent component 傳遞的來 props:
function MyButton({ count, onClick }) {
  return (
    <button onClick={onClick}>
      Clicked {count} times
    </button>
  );
}
當你點擊按鈕時,將觸發 onClick handler。每個按鈕的 onClick prop 都設定為 MyApp 中的 handleClick 函式,所以它裡面的程式碼可以執行。該程式碼呼叫 setCount(count + 1),增加 count state 變數。新的 count 值作為 prop 傳遞給每個按鈕,因此它們都顯示新值。這被稱為「提升 state(lifting state up)」。通過向上移動 state,你已經在 component 之間共享它。
import { useState } from 'react';

export default function MyApp() {
  const [count, setCount] = useState(0);

  function handleClick() {
    setCount(count + 1);
  }

  return (
    <div>
      <h1>Counters that update together</h1>
      <MyButton count={count} onClick={handleClick} />
      <MyButton count={count} onClick={handleClick} />
    </div>
  );
}

function MyButton({ count, onClick }) {
  return (
    <button onClick={onClick}>
      Clicked {count} times
    </button>
  );
}